Introduction
Attachment Framework started off as a basic replacement to create weapon attachments like flashlights and visible lasers but has since grown. Along with NV-System you will also gain IR laser functionality and IR flashlight/illuminator.
The main purpose of Attachment Framework is to create a generalized resource dependency modders can use to quickly add pre-made flashlight/laser attachments or quickly create their own light-based attachments as well as other useful resources related to weapon/attachment creation. Now just because this is meant to be used as a resource does not mean you can take whatever scripts you want out of it. It's meant to be a DEPENDENCY resource. Yeah i'm talking about you Pronto.
Contributors
- MCTIDDIES4LUNCH
- Tonic
Full Feature List
- * Flashlight & Laser weapon attachments
- * Range-finder weapon attachment
- * Detachable Bipods
- * Radial wheel for all attachments (minus bipod)
- * Recoil-reduction on attachments (Functionality, no active attachments in pack with it)
- * Rail System for creating modular guns like in the RU StrikeWorks pack by SRGShadows
- * Dynamic sights to automatically fold built in sights when optics are attached
- * Helper class for creating bolt-action rifles and only ejecting shell when racked
Lasers & Flashlight setup
This is pretty straight forward and trivial and you can mostly refer to one of the pre-existing prefabs on how they're setup. The primary component is AFW_LightsComponent, this is essentially a light entity manager. Note you can have multiple light sources tied to the entity, when you add a light source to the AFW_LightsComponent you'll be met with these parameters.
- Light Source Type
- Sound Event Name
- Light Prefab
- Original LV
- Original Color
- Lens Color
- Lens Intensity
With just AFW only FLASHLIGHT and LASER are available, with NV-System you'll have the additional IR laser and Illuminator (ir flashlight). This is used to identify the source for turning on/off. You can add your own types to offer unique functionality etc.
Sound event to be triggered upon activation/deactivation specified in an ACP declared in the SoundComponent
Prefab that is the light source
Original LV that was set in the light entity prefab. It is currently not possible to get the lightEntity's LV or color so this is required to be declared
Same reason as above
This is used for setting emissive coloring to a material used in conjunction with ParametricMaterialInstanceComponent
Same as above
The only other tidbits to be aware of are the actions placed on the ActionsManagerComponent. These actions are both interacted with on the entity its self and through the radial menu when the attachment meets the correct requirements for being considered "equipped"
Bipod Configuration
Only requirement is the weapon must have a bone or memory point not in use near the mounting point.
First add the component AFW_BipodControllerComponent to your weapon and put the bone name that you'll be using as the stabilizer point. Afterwards go to the SCR_WeaponAttachmentsStorageComponent and under Custom Attributes->AimingModifierAttributes->DeploymentPoints set a stabilization point. Set the target bone/memory point as the Pivot ID.
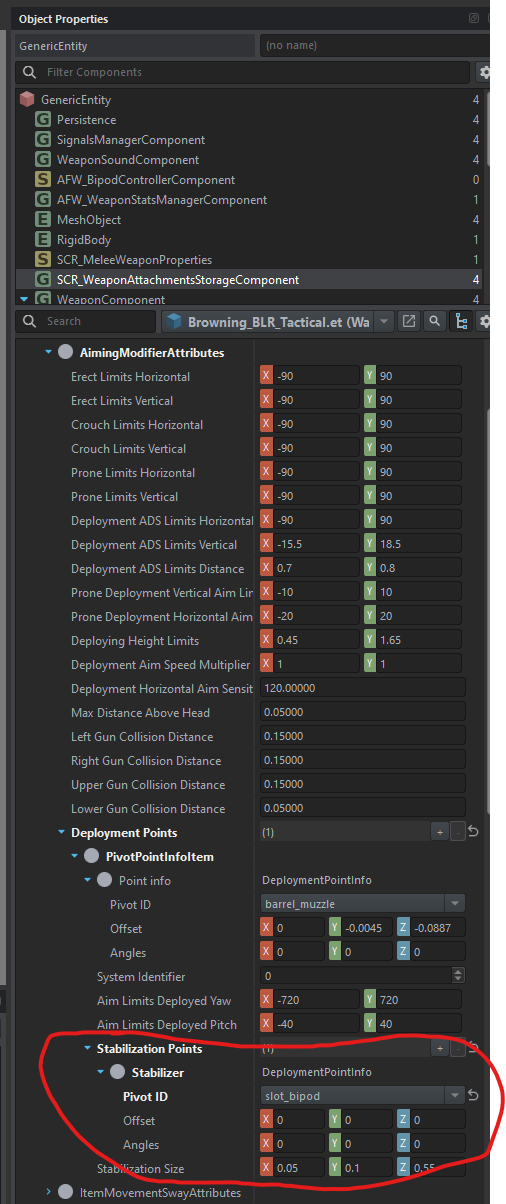
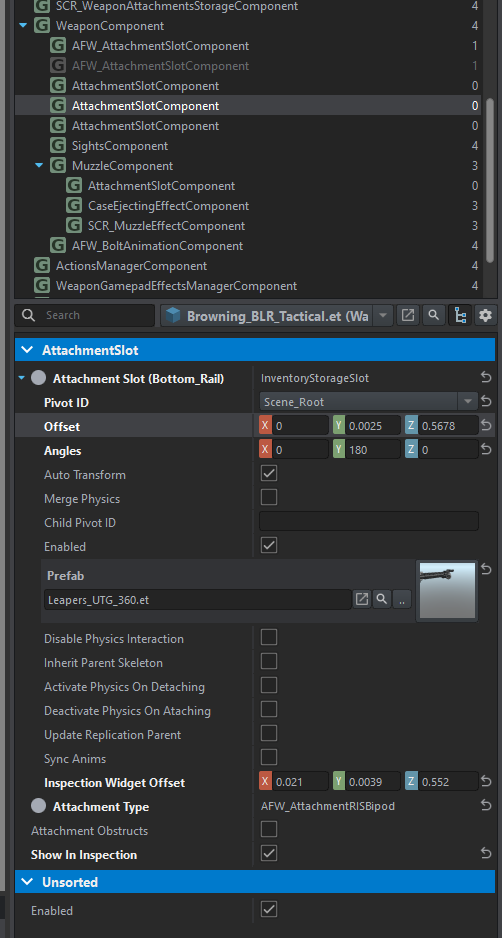
Next add AttachmentSlotComponent as a child to WeaponComponent and make sure to set the Attachment Type to AFW_AttachmentRISBipod. IF you are creating your own unique bipod for lets say barrel mounting then your unique attachment type needs to inherit from AFW_AttachmentBipod otherwise it will not register. DO NOT set the pivot ID as your stabilizer point. The Stabilizer point is moved for functionality to work so attaching it to that will cause the bipod attachment to move.
Nothing else is required for it to function however you should adjust the action placement of the context bipod so players can have a smooth interaction with the inspection view.
Bipod Creation
Creating a bipod is really no different then how you normally would on the weapon the only exception is you need to have a specific bone / memory point called w_stabilizer_point. Without this bone the system will not function, it is used for setting the offset height to apply to the stabilization bone on the weapon. Generally you want it to be positioned just slightly below the feet of the bipod. Refer to the included bipods bone/skeleton structure. I recommend to make it a bone as I may change it around in the future where the deployed state will be based on position of w_stabilizer_point.
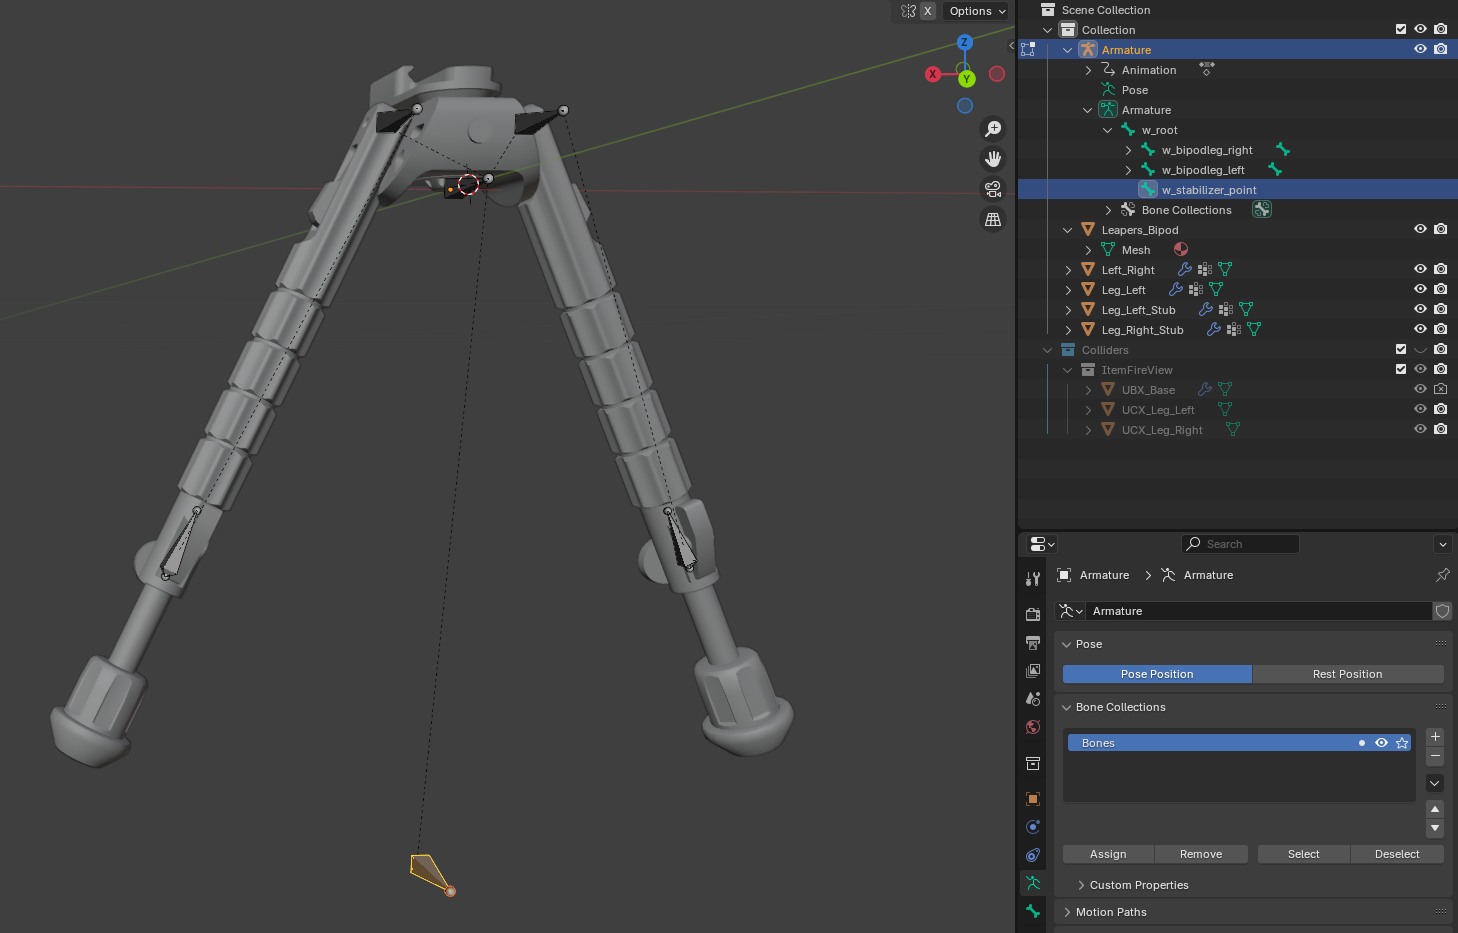
As for animating it the animation setup/process is the same as a static bipod on the weapon mesh its self.
For sound configuration if you want a custom folding/unfolding sound just dupe/inherit off the included one and change it there.
If you are creating a unique attachment-type for the bipod you must inherit from AFW_AttachmentBipod otherwise the system will fail to recognize your attachment / slot.
You can download the Bipod Example Rig here which contains the bone rig for the UTG bipod as well as the animation action and export profile
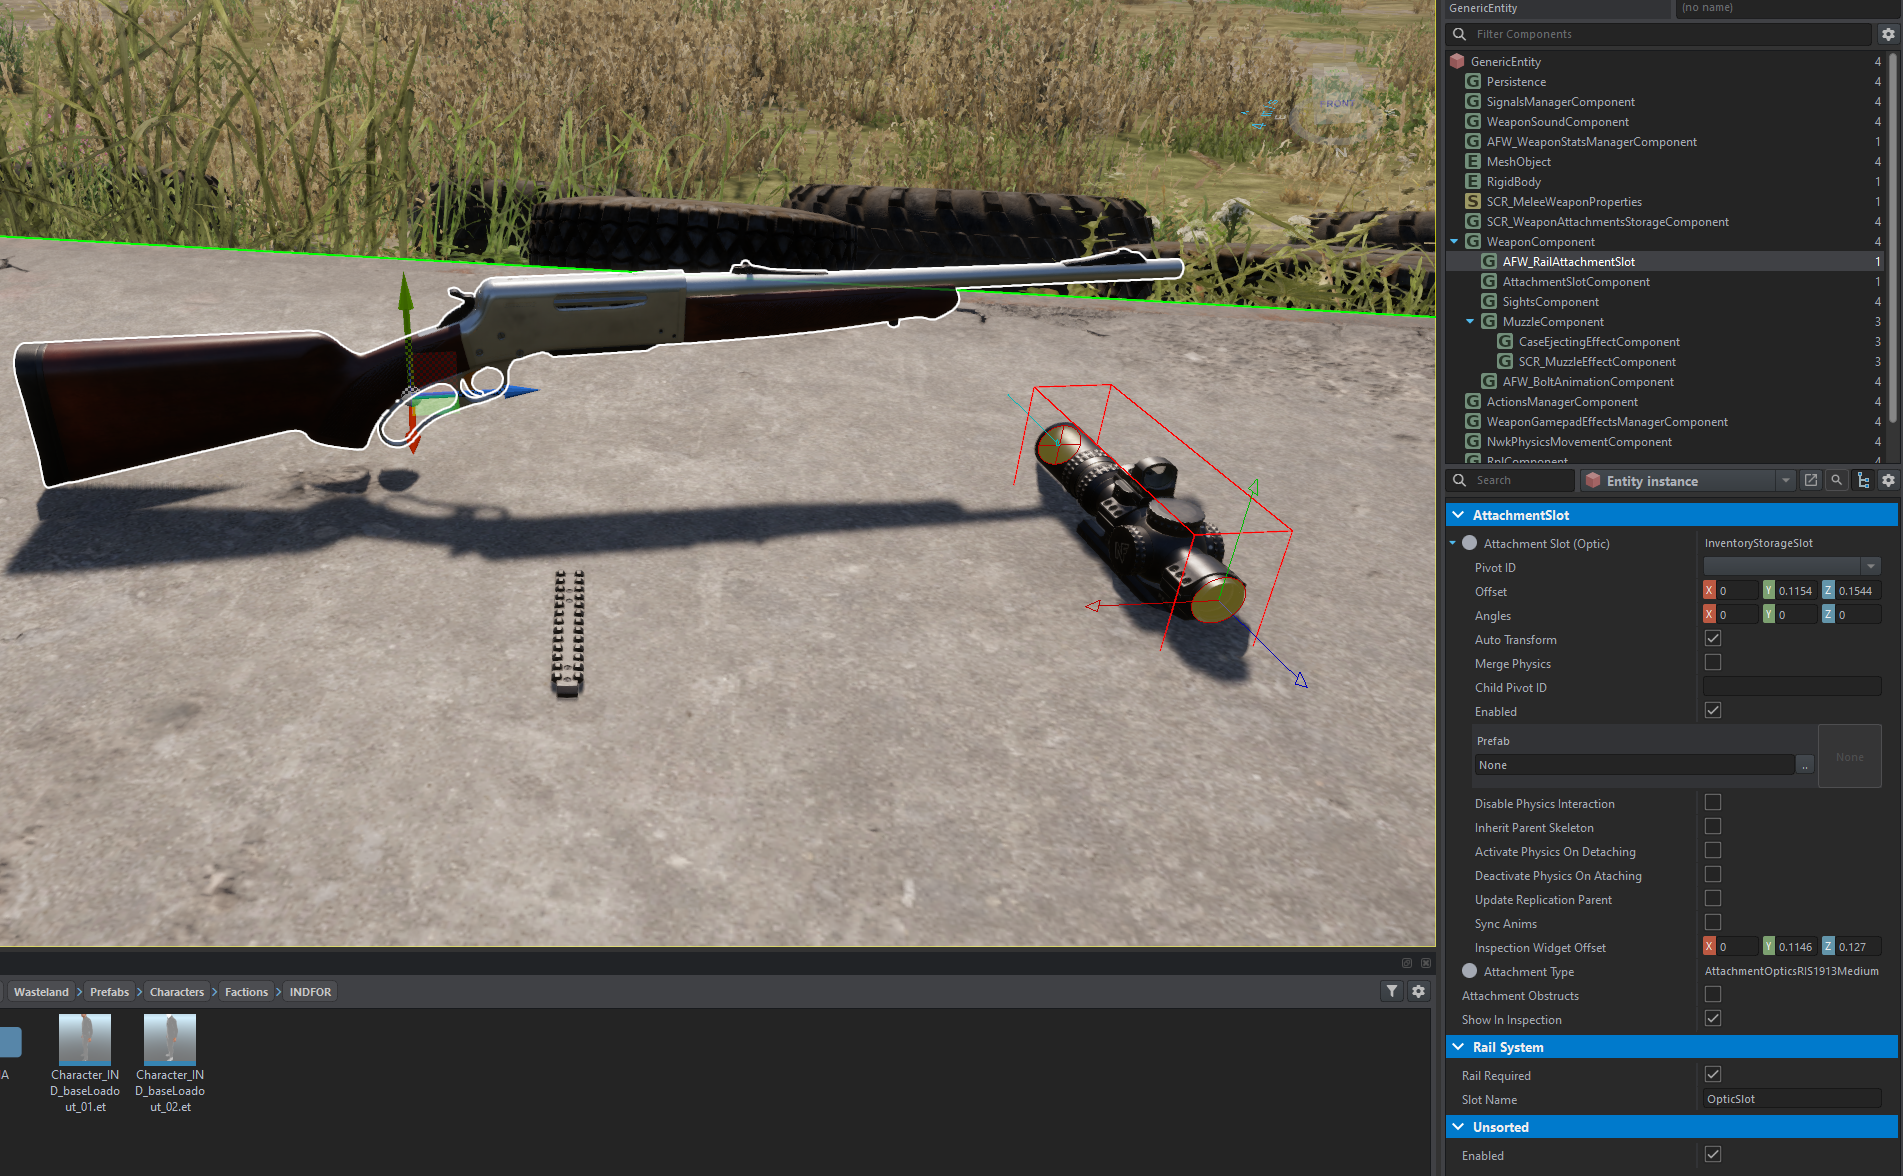
Rail System
The rail system is sort of like the attachment obstruction system but less confusing and just works. For the example I have a rifle that can have a rail screwed onto it, when that rail is "equipped" then I'll be able to equip an optic. When the rail is removed then the "optic" is removed as well.
First you'll need to create your equipable "rail", you can look at the VZ stock or M16 handguard rail to see how to create gun parts, to make them equipable you need to assign a unique attachment type to them and make sure InventoryItemComponent is enabled. Once you have your item created add the custom attribute AFW_RailItemAttribute to custom attributes under the InventoryItemComponent. You'll be presented with a list, add an entry and name the slot you want to link it to, for this example we only have 1 slot which will be used for optics so we'll call it OpticSlot.
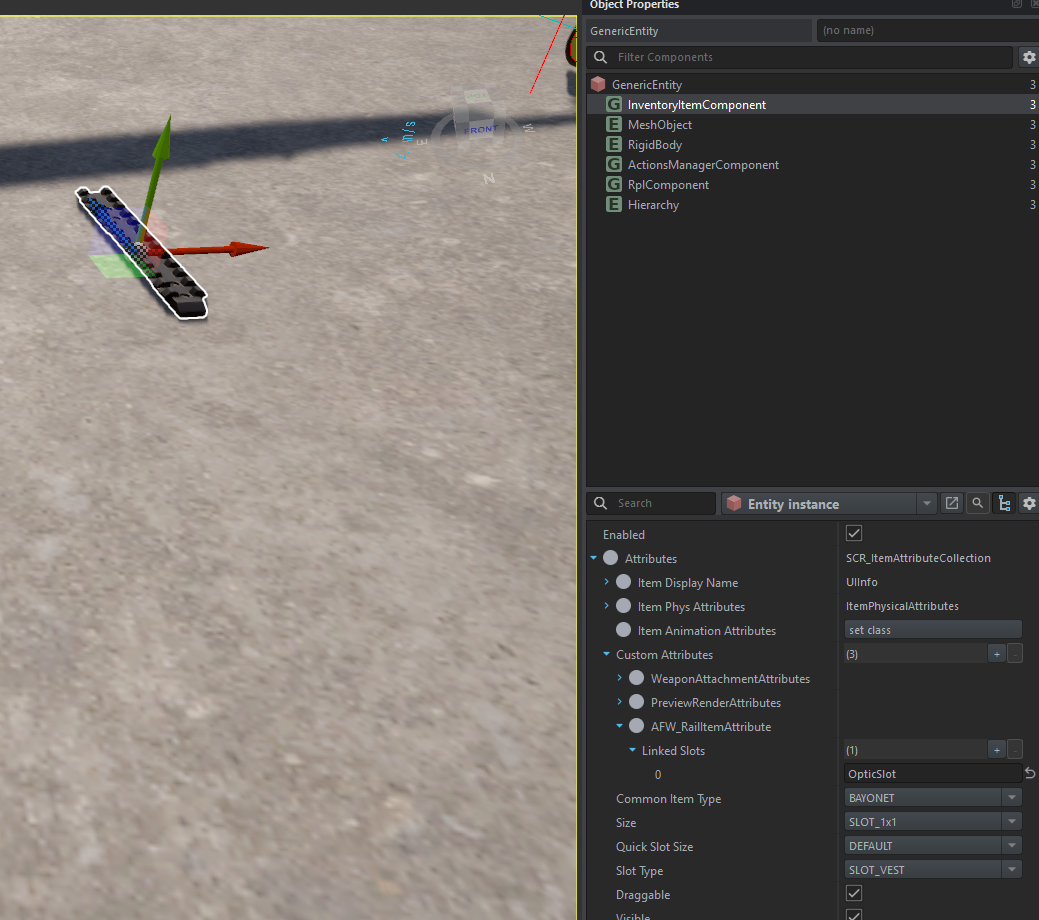
Now on the weapon start adding your attachment slots, any attachment slot that is going to require the "rail system" needs to be AFW_RailAttachmentSlot. This custom component will be used for other things in the future. For this example we only have one slot and we determined that it will be called OpticSlot so after you've added AFW_RailAttachmentSlot make sure to set the Slot Name to OpticSlot and check the box saying Rail Required and that's it, you shouldn't need anything else for it to work. Any slots linked on the rail attachment will have their attachments automatically removed when the rail is removed and unless a rail with linked slots is equipped you won't be able to put attachments on it.
Attachment Recoil Adjustment
Ever wanted your foregrip attachment to reduce or increase the recoil? Well with AFW you can! First your weapon will need the component AFW_WeaponStatsManagerComponent on it. If you already have SCR_WeaponStatsManagerComponent on it then just change the class over to AFW.
Next you want to edit your attachments InventoryItemComponent and add a custom attribute called AFW_AttachmentRecoilAttribute. This attribute functions the same as the one that you find on most muzzles or suppressors with the only exception it does not allow you to change the bullet coef and you must specify the muzzle manually which is usually 0 by default unless you have some crazy setup.
For configuring the linear, angular or turn factors it's the same as muzzles and suppressors so you can refer to the BI Wiki on that. A tl;dr is if you want to reduce overall recoil by 5% you would put 0.95, 0.95, 0.95 for all 3 factors X Y and Z.
Dynamic Sights
Currently the only public example is the VSSK in the StrikeWorks RU Small arms pack but if you want to have dynamically folding sights for when an optic is attached all you need is AFW_WeaponStatsManagerComponent on the weapon and AFW_DynamicSightsComponent. You will have to create a proc animation for it to work.
Bolt Animation Helper Class
Included in AFW is a custom WeaponAnimationCompoent called AFW_BoltAnimationComponent that you can use on bolt-rifles. The idea is you don't want the casing ejection particle to trigger unless you rack the bolt and thus is why I made this as all my weapon mods require AFW.. So yeah.. one stop shop..